Win Conditions Explained
A deep dive into the three paths to victory in Splendor Duel: prestige, crowns, and color collection. Learn when to pursue each and how to keep your options open.
13 min read
Why Three Win Conditions Matter
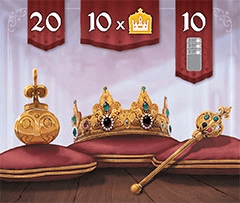
Splendor Duel is not a game where you simply race toward one finish line. The existence of three distinct victory paths (20 prestige points, 10 crowns, or 10 prestige points on cards of the same color) creates a web of strategic tension that elevates the game far beyond a simple engine builder. Every card you purchase, every gem you take from the board, and every turn you spend advances you along one or more of these axes, and the interplay between them is what separates competent players from truly dangerous ones. Understanding these paths is not just about knowing the rules; it is about internalizing how each path warps the decision space for both you and your opponent.
The three-condition structure forces a fundamental tradeoff between focus and flexibility. A player who tunnels on prestige points may accumulate an impressive score only to lose in a single turn to an opponent who quietly assembled ten crowns. A player who spreads too thin across all three paths may find themselves close to everything but finishing nothing. The art of Splendor Duel lies in maintaining credible threats along multiple win conditions for as long as possible, then committing decisively when the moment is right. This guide breaks down each path in detail and then explores how to weave them together into an adaptive, pressure-based strategy. If you are new to the game, our beginner's guide covers the rules and fundamentals.
Prestige Victory: The 20-Point Race
How Points Accumulate
Prestige points come from two sources: the point values printed on development cards and the points awarded by Royal cards. Level 1 cards rarely carry more than one prestige point, and many carry zero; their primary purpose is to build your gem bonus engine cheaply. Level 2 cards occupy the middle ground, typically offering one to two points along with a useful bonus (with the rare gold card worth five). The real prestige payloads sit at Level 3, where individual cards can be worth three, four, or even six points. A prestige-focused strategy therefore depends heavily on your ability to efficiently purchase these expensive top-tier cards, which in turn requires a well-constructed engine of lower-level bonuses. Our gem economy guide covers how to build this compound advantage efficiently.
Royal cards add another dimension to prestige scoring. Royal cards are worth two to three prestige points each and are earned when your crown count reaches 3 and again at 6. Three of the four Royal cards also grant a special ability: stealing a gem from your opponent, taking another turn, or gaining a Privilege. Because Royal cards are claimed as a side effect of purchasing crown-bearing development cards, they can create sudden point swings that catch an opponent off guard. A player sitting at 14 points who buys a four-point Level 3 card and triggers a Royal claim worth 3 points can jump to 21 in a single action, ending the game before the opponent has a chance to respond.
Typical Prestige Victory Timelines
A prestige victory is generally the slowest of the three paths, which is both its weakness and its strength. Most prestige wins involve purchasing somewhere between seven and ten cards total, with the game typically lasting twelve to sixteen turns for the winning player. A representative winning tableau might look like this: three or four Level 1 cards providing the bonus foundation (contributing zero to three total points), two or three Level 2 cards adding two to five points, one or two Level 3 cards contributing three to ten points, and possibly a Royal card for two or three more. The exact distribution varies, but the pattern is consistent: you need a broad base to support an expensive peak.
Because prestige is the default condition that most players naturally work toward, it offers the advantage of being the most robust path. Even if you end up pivoting to crowns or colors mid-game, the engine you built for prestige will have value. The danger is complacency: if you assume prestige is your only path, you may spend too many turns optimizing your engine while your opponent assembles an alternate win under your nose.
When Prestige Is Strongest
Pursue a prestige-first strategy when you see a clear engine line in the early game: a cluster of Level 1 and Level 2 cards whose bonuses feed into available Level 3 cards. If the Level 3 row features cards worth three to six points that align with colors you are already collecting, prestige becomes the path of least resistance. Prestige is also strongest when your opponent is pursuing the same path, because a prestige mirror tends to favor the player with the more efficient engine, and you can race head-to-head rather than worrying about orthogonal threats.

Tip: Count your opponent's points every turn. If they are at 15 or above, you need to either race them to 20 or start actively blocking their access to high-value cards. Losing track of the scoreboard is one of the most common mistakes in prestige-oriented games.
Crown Victory: The Stealth Path to 10
Crown Distribution Across Card Levels
Crowns are scattered across all three card levels, but their distribution is uneven in ways that reward careful attention. Level 1 cards can carry one crown, and because these cards are cheap, they offer an efficient way to start accumulating. Level 2 cards may carry one crown, and Level 3 cards can feature two crowns alongside their prestige value. Royal cards do not carry any crowns; they are earned by reaching crown thresholds (3 and 6), but they provide prestige points and abilities rather than additional crowns. Understanding where crowns are concentrated in the remaining deck and the visible market is essential for any crown-oriented strategy.
The Stealth Nature of Crown Wins
Crown victories are famously sneaky, and this is by design. Because crowns do not have an obvious running total the way prestige points do (there is no scoreboard for crowns, just symbols scattered across your tableau), opponents who are not actively counting can lose track of your progress. A player with seven or eight crowns may not look threatening to an opponent fixated on their own prestige engine, especially if those crowns are spread across many low-profile Level 1 and Level 2 cards. Then a single purchase of a two-crown card pushes them to ten, and the game ends before the other player can react. This asymmetry of attention is one of the most powerful features of the crown path: it exploits the natural human tendency to focus on the most visible metric (points) rather than the one that actually matters.
The flip side is that crown wins are harder to plan from the start. You cannot simply decide "I will collect crowns" on turn one the way you might commit to a prestige engine. Instead, crown victories tend to emerge organically: you buy a few crowned cards because they happen to fit your engine, you notice you are at six or seven, and you pivot. The best crown players are opportunistic. They keep a mental tally of their crown count at all times and recognize the inflection point where crowns shift from a secondary benefit to a primary win condition.
Defending Against Crown Wins
Because crown victories rely on stealth, the best defense is simply paying attention. Count your opponent's crowns at the start of every turn, not approximately, but exactly. Once they reach six or seven, start evaluating every card in the market not just for its value to you, but for its crown contribution to them. Blocking becomes especially important when the market contains a two-crown card that would push your opponent over the threshold. Sometimes the correct play is to buy a card you do not need, or even to take gems that deny your opponent access to a critical crowned card, purely as a defensive measure. The tempo cost of a blocking turn is almost always worth it if it prevents an immediate loss.
Tip: Royal cards are earned at the 3 and 6 crown thresholds. If your opponent is at 5 crowns and about to buy a card with 1 crown, they will trigger a Royal claim worth 2-3 points and a potential ability. Track not only their crown count but also whether their next purchase might earn a Royal.
Color Victory: The Concentration Gambit
The Structure of a Color Win
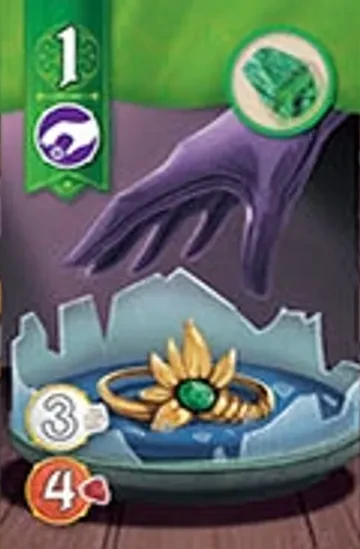
To win by color concentration, you must accumulate 10 or more prestige points on cards of a single color. A card's color is determined by its bonus gem color. Associate cards count as the color of the card they are grouped with, making them powerful tools for concentrating points. This win condition rewards deep investment in one color rather than diversification, and it can end the game faster than a 20-point prestige race when the right cards align.
How Points Stack by Color
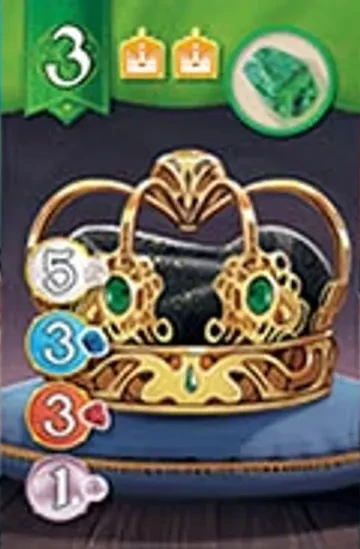
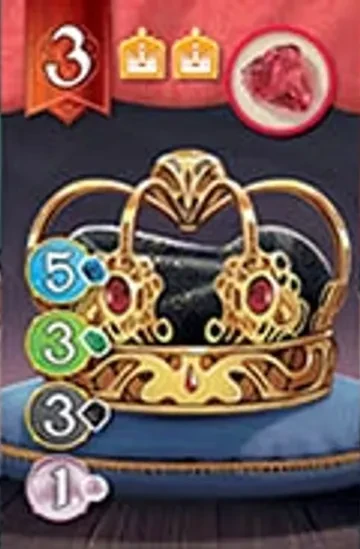
Consider the point values available in a single color. Each color has two Level 3 cards: one worth 3 points (with 2 crowns) and one worth 4 points. Each color also has Level 2 cards worth 1-2 points. If you can purchase both Level 3 cards in one color (7 points combined) plus a couple of Level 2 cards in the same color, you can reach 10. Associate cards make this easier: a Level 3 Associate worth 3 points can be grouped with your chosen color, pushing you over the threshold even faster.
How to Drift Toward Color Victory
The most successful color victories are not planned from turn one; they are recognized during the mid game. As you build your engine, you will naturally purchase cards concentrated in certain colors based on what the market offers. If you reach the mid game with 5-6 prestige points already in a single color, the color path suddenly becomes viable with one or two more purchases. The key is awareness: after every purchase, tally your prestige points by color. If you notice a concentration forming, start targeting high-point cards in that color.
The hardest part of the color path is knowing when to commit versus when to abandon. If you have 6 points in green but no affordable green Level 3 cards are visible, the math may not work. Your opponent could close out a prestige or crown victory while you wait. Conversely, if a 4-point green Level 3 card appears and your engine can afford it, that single purchase could push you to 10 and end the game immediately.
Tip: Keep a running tally of your prestige points by color. Once any color reaches 6-7 points, start scanning the market for high-point cards and Associates that could push you to 10. One turn of inattention can mean missing the window entirely.
Adaptive Strategy: Keeping All Doors Open
Reading the Game State
The strongest Splendor Duel players do not pick a win condition at the start of the game. Instead, they build a flexible engine during the first several turns (prioritizing cards that offer strong gem bonuses, reasonable point values, and perhaps a crown or two) while monitoring all three paths simultaneously. By the mid game, the board state, the opponent's tableau, and the available market will usually suggest which path offers the highest probability of success. The skill lies in recognizing that moment and committing without hesitation. Commitment too early locks you into a path that may get blocked; commitment too late wastes turns on generalized play when you should be sprinting toward a finish line.
Win Condition Pressure
One of the most powerful concepts in Splendor Duel strategy is what experienced players call "win condition pressure." This is the idea that threatening multiple win conditions simultaneously forces your opponent to spread their defensive attention thin. If you are at 16 prestige points and seven crowns, your opponent cannot block both axes at once; buying a high-point card and buying a high-crown card are often different actions, and they only get one turn. By maintaining credible threats along two or even all three paths, you create situations where your opponent must guess which threat is real, and guessing wrong costs them the game.
Building win condition pressure is not about randomly accumulating a little of everything. It requires deliberate card selection: choosing cards that advance multiple win conditions at once. A card with two prestige points and two crowns is more valuable in a pressure-based strategy than a card with four prestige points and no crowns, even though the latter is "worth more" in a pure prestige race. Similarly, a card that fills a missing color in your collection while also carrying a crown is a dual-threat purchase that keeps your opponent guessing. The more axes your purchases advance simultaneously, the harder you are to defend against.
Defensive Awareness
Adaptive strategy is not only about your own win conditions; it is equally about tracking your opponent's. Every turn, you should be asking three questions: How many total points do they have? How many crowns do they have? Are they concentrating points in a single color? If any of those numbers is approaching the danger zone (roughly 15+ total points, 7+ crowns, or 6+ points in one color), you need to factor defensive considerations into your turn. Sometimes defense means blocking a specific card. Sometimes it means accelerating your own win condition to finish first. And sometimes (perhaps most importantly) it means recognizing that your opponent is threatening two paths at once and deciding which one you can afford to concede and which one you must shut down.
The interplay between offense and defense, between commitment and flexibility, and between the three win conditions themselves is what gives Splendor Duel its extraordinary depth. Master all three paths, learn to read which one the game is offering you, and you will find yourself winning games you had no business winning, not because you were lucky, but because you understood the architecture of victory better than your opponent.
For more on building the engine that powers these victories, see our gem economy guide. To sharpen your card evaluation skills, read the card selection strategy guide. And to eliminate the errors that cost you games, check out common mistakes to avoid. You can also browse every card or check our tier list to see how each card ranks.